
ReviewCoreASPHosting.NET | Best and cheap ASP.NET MVC hosting. ASP.NET Identity is the new Microsoft Framework dedicated to the security management of ASP.NET applications : MVC, Web forms, WEB API .
This new framework enables efficient and effective security management of ASP.NET applications, and this through:
- Managing users and their permissions to access ASP.NET applications,
- Management of entitlements and access rights to the different components of an ASP.NET application.
To do this, the ASP.NET Identity framework defines a set of APIs that allows the management of users, roles and their access permissions.
By default, MS Identity framework create specific entities and database.
Sometimes this will poses problems, especially if we want to integrate the Ms Identity framework entities (users, roles…) with our specific application model.
In this article we will see how to integrate the Microsoft Identity framework entities with an ASP.NET MVC application specific model Using the Code First Entity framework approach.
To achieve this goal, we will use an ASP.NET MVC application with code first Entity framework approach, with the Ms Identity framework.
Using the code
To demonstrate how to integrate the Ms Identity with an ASP.NET MVC, we will develop an ASP.NET MVC application to manage project.
For demo purpose, our application will consiste of only two layers : Presentation Layer ans the Model Layer.
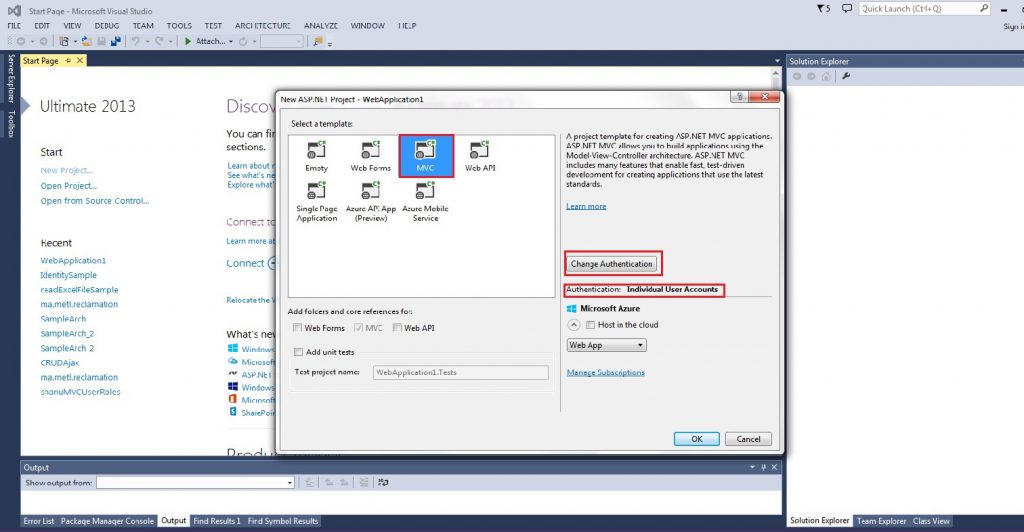
First step : Create a New ASP.NET MVC with Identity enabled :
In Visual Studio, Goto – File –> New –> Project : then select ASP.NET Web Application, make the name of the application : MsIdenityIntegration and click “Ok”.
After, Select MVC and select Individual Users Account to enable MS Identity in your application :
A New ASP.NET MVC Project is created and the identity classes are also created in the Models folder. whithin this folder, you will notice that there is three classes :
– IdentityModels : this file contain two importants classes : ApplicationUser this class allow you to create users and manage there responsabilities. ApplicationDbContext this class is the DBcontext of the Identity framework. note that this class inherit from IdentityDbContext and not from the usuel DBContext.
– AccountViewModels and ManageViewModels : this files contains the Models that will be used in our differents views
Second step : Create our code first Model
For demo purpose, our code first Model will contain only one class : Project.
Raght-click on the solution name, and choos Add–> New Project and then select “Class Library”. In the name field, write : MsIdentityIntegration.Model. Rename the default created class file class.cs to Project.cs.
Below is the snippet code of the Project.cs class containing the Project Entity Model
using System;
using System.Collections.Generic;
using System.Linq;
using System.Text;
using System.Threading.Tasks;
using System.ComponentModel.DataAnnotations;
using System.ComponentModel.DataAnnotations.Schema;

namespace IdentitySample.Model
{
  public class Projet
  {
     [Required]
     [Key]
     public string code { get; set; }

     [Required]
     [MaxLength(250)]
     public string Libelle { get; set; }

     [Required]
     public DateTime startdate { get; set; }

     [Required]
     public int expectedDuration { get; set; }
  }
}
Once we have created the Project Entity Model, we need to created our DBContext.
And new class named as “MyDbContext.cs”. Project name->right click-> Add-> class.
using System;
using System.Collections.Generic;
using System.Data.Entity;
using System.Linq;
using System.Text;
using System.Threading;
using System.Threading.Tasks;

namespace IdentitySample.Model
{
    public class MyDbContext : DbContext
    {

        public MyDbContext() : base("Name=DefaultConnection")
        {

        }

        public DbSet<Project> Projects { get; set; }

  }

}
A this stage, we have created two seprated Model and DBContext: one for the Ms Identity entities and the other for our specific ASP.NET MVC application. This will cause two principals problems :
1. We can’t bind the Ms Identity framework entities to our specific entities : for example, in our model , we need to add project manager to our Project model. This property (project manager) must be linked to the user of our application. This is not possible if we have two separated model and DBContext,
2. We will have two separated database : one for the Ms Identity entities and the other for our specific application
To overcome this problems, we are going to merge the Ms Identity framework model with our specific Model
Third step : Integrate the Ms Identity Model with our specific application Model
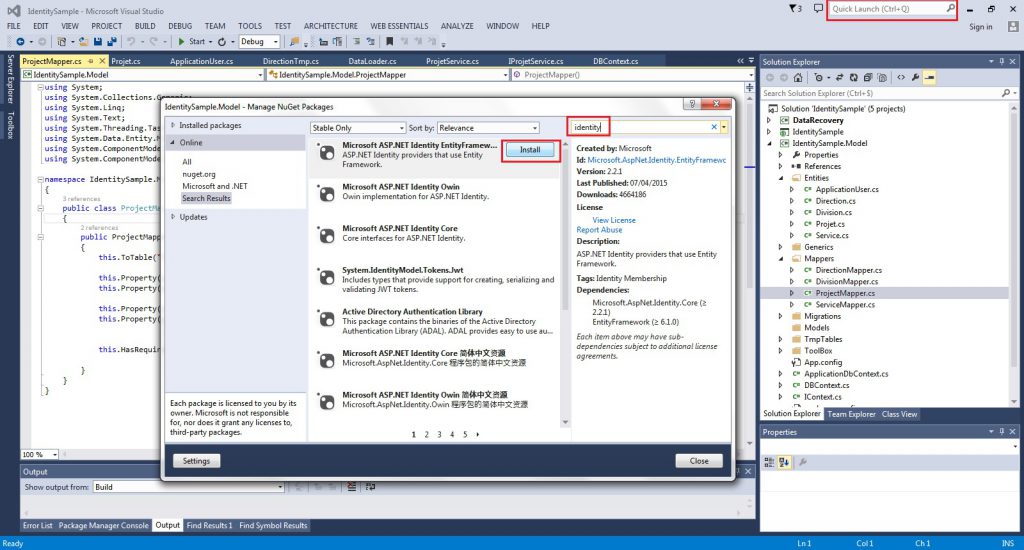
First thing to do, is to install the Ms Identity framework in the MsIdentityIntegration.Model project. So, tape “Manage Nuget Packages” on the quick launch bar field, the nuget package manager will be displayed. Tape “Identity” on the search bar field, select Microsoft ASP.NET Identity and click Install (like the figure below ) :
Locate the IdentityModel.cs in the Model repository, rename it to ApplicationUser.cs and deplace this file to the IdentitySample.Model Project.
Modify this file, delete the DBContext class and add your customized property : firstname, lastname….
the ApplicationUser will look like this :
using Microsoft.AspNet.Identity.EntityFramework;
using System.Security.Claims;
using System.ComponentModel.DataAnnotations;
using System.ComponentModel.DataAnnotations.Schema;

namespace IdentitySample.Model
{
    public class ApplicationUser : IdentityUser
    {
        public async Task<ClaimsIdentity> GenerateUserIdentityAsync(UserManager<ApplicationUser> manager)
        {
          // Note the authenticationType must match the one defined in CookieAuthenticationOptions.AuthenticationType
          var userIdentity = await manager.CreateIdentityAsync(this, DefaultAuthenticationTypes.ApplicationCookie);
          // Add custom user claims here
          return userIdentity;
        }

        public string FirstName { get; set; }
        public string LastName { get; set; }

    }

}
Afterward, add the Project Manager property to the Project.cs file and link it to the ApplicationUser model.
The snippet code below, show the Project.cs file after modifications :
using System;
using System.Collections.Generic;
using System.Linq;
using System.Text;
using System.Threading.Tasks;
using System.ComponentModel.DataAnnotations;
using System.ComponentModel.DataAnnotations.Schema;

namespace IdentitySample.Model
{

    public class Projet
    {
        public Projet()
        {
            projectManager = new ApplicationUser();
        }

        [Required]
        [MaxLength(250)]
        public string Libelle { get; set; }

        [Required]
        public DateTime startdate { get; set; }

        [Required]
        public int expectedDuration { get; set; }

        public string UserId { get; set; }
        [ForeignKey("UserId")]
        public virtual ApplicationUser projectManager { get; set; }

    }
}
Once our code first model is ready, we must modify the DBContext to integrate the Ms Identity framework.
using System.Threading.Tasks;
using Microsoft.AspNet.Identity;
using Microsoft.AspNet.Identity.EntityFramework;
using System.Data.Entity.Migrations;
using System.Data.Entity;
using System.Web;
using System.Data.Entity.ModelConfiguration.Conventions;

namespace IdentitySample.Model
{
    public class MyDbContext : IdentityDbContext<ApplicationUser>
    {
        public MyDbContext() : base("DefaultConnection", throwIfV1Schema: false)
        {
            Configuration.ProxyCreationEnabled = false;
            Configuration.LazyLoadingEnabled = false;

        }

        public IDbSet<Projet> Projects { get; set; }
    }
}
To integrate the Ms Identity framework, our DBContext (MyDbContext) must inherit from the IdentityDbContext instead of DBContext.
Fourth step : Create the database and check the Ms Identity Integration
Now we will create the database and check wether the Ms Identity framework entities are integrated with our application entities. for that, on the “Package console management” run the commands below :
- PM > Enable-Migrations -ProjectName MsIdentityIntegration.Model
- PM > Add-Migration -ProjectName MsIdentityIntegration.Model
- PM > Update-Database
Normaly, a single database will be created containings the Ms Identity framework tables and the Project table. The diagram below show the relationship between the Ms Identity tables and our custom Project table :
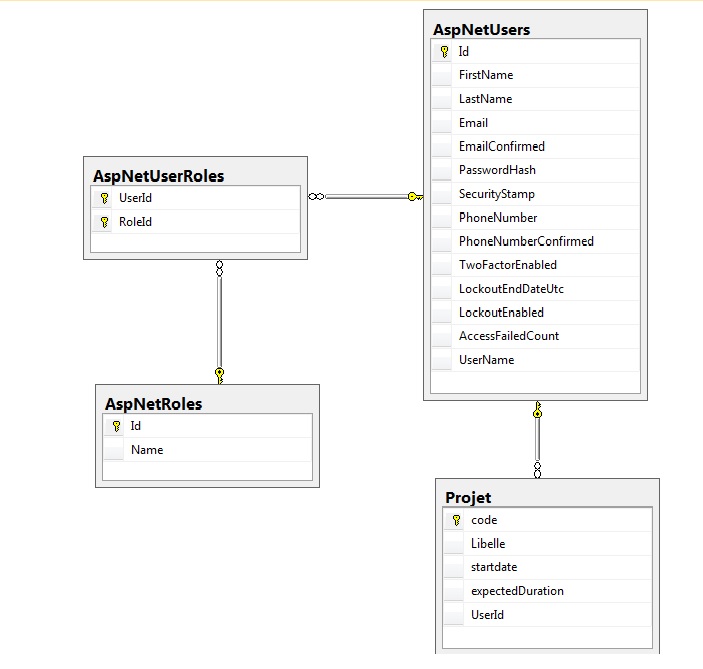
Like showen in the diagram above, the Ms Identity Framework is now integrated with our business model (porject) .
Points of Interest
This article was written for readers that are familiar with the code first approach and Ms Identity framework and want to integrate the Microsoft Ms Identity framework with there ASP.NET MVC Application. It present a simple approach to link the Ms Identity entities with the specific application entities.
After following the steps given in this article, readers would be capable to :
- Link the Ms Identity framework entities with the specific application entities,
- Create a single database for Ms Identity framework and the application model.