
ReviewCoreASPHosting.NET | Best and cheap ASP.NET MVC core hosting. This article refers to an earlier version of the .NET Core SDK and project.json which Microsoft has deprecated in favour of a revamped .csproj file.
Now let’s add MVC to the picture.
Start off by modifying project.json to require the MVC packages.
{
  "version": "1.0.0-*",
  "buildOptions": {
    "debugType": "portable",
    "emitEntryPoint": true
  },
  "dependencies": {},
  "frameworks": {
    "netcoreapp1.0": {
      "dependencies": {
        "Microsoft.NETCore.App": {
          "type": "platform",
          "version": "1.0.0"
        },
        "Microsoft.AspNetCore.Server.Kestrel": "1.0.0",
        "Microsoft.AspNetCore.Mvc": "1.0.0"
      },
      "imports": "dnxcore50"
    }
  }
}
As with all dependencies, you’ll need to ensure it’s downloaded to your machine using the restore command.
dotnet restore
You’re all set to configure your web application to use MVC meaning you can start defining routes, using controllers and views.
Add a sprinkling of MVC
First, you need to make some changes to startup.cs.
using Microsoft.AspNetCore.Builder;
using Microsoft.AspNetCore.Http;
using Microsoft.Extensions.DependencyInjection;

namespace ConsoleApplication
{
    public class Startup
    {
        public void ConfigureServices(IServiceCollection services)
        {
            services.AddMvc();
        }

        public void Configure(IApplicationBuilder app)
        {
            app.UseMvc();

            app.Run(context =>
            {
                return context.Response.WriteAsync("Hello world");
            });
        }
    }
}
There are two important steps here.
.NET Core automatically uses Microsoft’s latest framework for dependency injection (hence the Microsoft.Extensions.DependencyInjection dependency). This provides a simple mechanism to register the services which your application needs.
Inside of the ConfigureServices method you can register any services (dependencies) that your application requires. In this case you’re registering all the services needed in order to use Microsoft’s implementation of MVC.
app.UseMvc() tells your app to add MVC to the request execution pipeline. This will ensure that all requests to your web application are routable to the MVC framework, meaning you can use controllers, views and anything else contained within the MVC implementation (action filters etc).
Throw in a controller
So far so good, but if you run your app you’ll still only see “Hello world”, so how do you start using MVC?
Well, unsurprisingly you’ll need a controller. In ASP.NET Core your controllers can live anywhere meaning you don’t have to stick to a Controllers folder if you don’t want to. But old habits die hard so let’s keep it simple for now.
In a command prompt, change to your app’s folder then create a new Controllers folder and HomeController.cs.
md Controllers
cd Controllers
NUL> HomeController.cs
(In case you don’t recognise it, that last command creates a new empty file).
Now add the following to your controller.
using Microsoft.AspNetCore.Mvc;
public class HomeController : Controller
{
    [Route("home/index")]
    public IActionResult Index()
    {
        return Ok("Hello World from a controller");
    }
}
Attribute Routing is probably the simplest way to get started and means you can stay focused on building your features whilst tweaking the routing to something that makes sense for your specific app.
Is it data? is it a View? No it’s an ActionResult
ASP.NET Core doesn’t differentiate between MVC and Web API controllers, so you can return views or data using the same approach.
In this example you’ve returned a simple string. You can just as easily return an object as data.
using Microsoft.AspNetCore.Mvc;
public class HomeController : Controller
{
[Route("home/index")]
public IActionResult Index()
{
return Ok("Hello World from a controller");
}
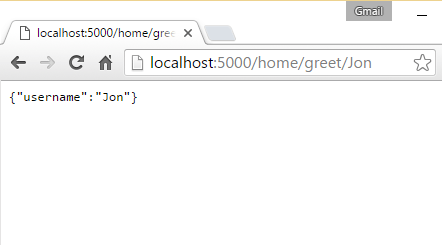
[Route("home/greet/{username}")]
public IActionResult Greet(string username){
var greeting = new Greeting{ Username = username };
return Ok(greeting);
}
}The Greeting class in this case is a simple affair with just one Username property.
If you haven’t already, run your application again.
dotnet run
Take a look at the results in your browser to see your very own personalised greeting as a JSON response.
Take in the view
If you want to return a view, that’s simple too.
Modify your controller’s index action to return a view instead.
public class HomeController : Controller
{
    [Route("home/index")]
    public IActionResult Index()
    {
        return View();
    }
}
By convention, Core will look in a few places to find a view with the same name as the action, in this case Index.cshtml.
Create a Views/Home folder in the root of your app and add an index.cshtml.
<div>
    <h1>Hello World from a view</h1>
</div>
At this point, if you try and go to /home/index you’ll get a nasty shock, nothing will appear, just a blank page.
Before you tear your hair out trying to work out why, let me save you the hassle. There are two more steps you need to take.
Firstly, Core will attempt to compile the razor views at runtime and fails unless you add a setting to your project.json file.
"buildOptions": {
  "preserveCompilationContext": true,
  "debugType": "portable",
  "emitEntryPoint": true
},
preserveCompilationContext ensures that various reference assemblies (e.g. System) are preserved so that Core can compile your razor views at runtime.
Secondly, you need to tell your Core app where to start looking for content files (e.g. views). You can specify this by setting the UseContentRoot() option in Program.cs.
using System.IO;
using Microsoft.AspNetCore.Hosting;

namespace ConsoleApplication
{
    public class Program
    {
        public static void Main(string[] args)
        {
            var host = new Microsoft.AspNetCore.Hosting.WebHostBuilder()
            .UseKestrel()
            .UseContentRoot(Directory.GetCurrentDirectory())
            .UseStartup<Startup>()
            .Build();

            host.Run();
        }
    }
}
Try hitting the page again now and you will see your rendered view.
And finally
So just to wrap this up, let’s add some dynamic data to your view.
Modify your controller to return your greeting object.
public class HomeController : Controller
{
    [Route("home/index/{username?}")]
    public IActionResult Index(string username = "you")
    {
        return View(new Greeting { Username = username });
    }
}
A simple change to your view and your page will offer you a friendly greeting (defaulting to “you” if a name is not specified in the request).
<div>
    <h1>Hello @Model.Username from a view</h1>
</div>
In Summary
Apart from one or two gotchas (looking at you preserveCompilationContext), extending your web application to use MVC is simply a matter of configuration.
In fact, much of what you’ll want to do with .NET Core, even completely changing the way your application works is a matter of knowing what’s available and then tweaking the configuration.