ReviewCoreASPHosting.NET | Best and cheap ASP.NET Core 2.0 hosting. We all know how important writing tests is when developing software. It ensures that your code is working as expected and allows you to more easily refactor the existing code. Tests can also help someone new to your application learn how it works and what functions it offers.
Each test level has its purpose, whether that be the unit testing or integration testing. Having good integration tests is important when you are developing software. It ensures your application’s end to end flow is working correctly.
While making sure your project has well-designed integration tests, it is equally important that your tests are easy to run and fast. This is an important point if there is a big investment to set up in order for the tests to run. If the tests take a long time to run, people are simply not going to use the application.
This blog post shows you how to create an in-memory integration testing framework that is quick and easy to setup for a .NET Core 2.0 Web Service.
In-Memory Testing
Using an in-memory web host allows us to setup and run our tests quickly and easily. Kestrel is a cross-platform development web server that is used by .NET Core applications.
“Kestrel is a cross-platform web server for ASP.NET Core based on libuv, a cross-platform asynchronous I/O library. Kestrel is the web server that is included by default in ASP.NET Core project templates.
Kestrel supports the following features,
- HTTPS
- Opaque upgrade used to enable WebSockets
- Unix sockets for high performance behind Nginx
Kestrel is supported on all platforms and versions that .NET Core supports.”
Creating a simple .NET core 2.0 WebApi
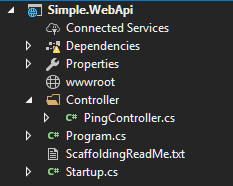
Below, I have set up a simple WebAPI in .NET Core 2.0 with a single Ping Controller. This returns an OK response when called. I will create my integration test project inside this solution, then write and run my tests against the Ping Controller.

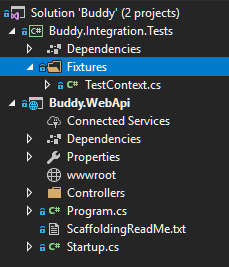
First, let’s create an integration test project inside our solution. I like to follow the following naming format ProjectName.Integration.Tests
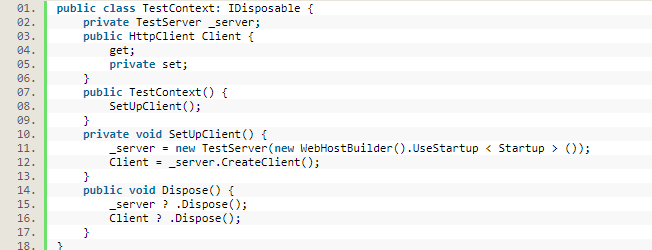
Now, we have our integration test project setup, we can start to create a test context. It is common for integration test classes to share setup and cleanup code, which we often call “test context”. We will use the test context to setup a hosting framework ready to run our integration tests on. The test context for this example will be used to setup the test server and client.
“ASP.NET Core includes a test host that can be added to integration test projects and used to host ASP.NET Core applications, serving test requests without the need for a real web host.
Once the Microsoft.AspNetCore.TestHost package is included in the project, you’ll be able to create and configure a TestServer in your tests.”

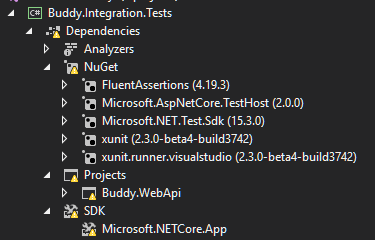
Another important package you need to install is the Microsoft.NET.Test.Sdkotherwise your tests will show “Test Inconclusive” in the ‘Test Session Runner’ when trying to run them.
Here is a list of the NuGet packages and versions I have installed. I’m including this screenshot because often, versions change and this can cause problems; also, the error messages can sometimes not be very helpful.

Creating tests with the structure above creates a new test context per test scenario. This isn’t always desirable, sometimes you want to setup your test context then run all tests or a collection of tests in your solution.
Setting up your test context once can have massive benefits, for example, if you need to deploy and publish a database as part of your integration test setup, doing this is going to take some time to complete. It might not make sense to setup the database for each test scenario. What would be a better plan, would be to set it up once, then run all your tests that interact with the database.
Xunit allows us to setup and create collections.
First, we need to create a collection class. This class can be named whatever makes sense to you.

The collection class will never have any code inside it. The purpose of this class is to apply the [CollectionDefinition] decorator and all of the ICollectionFixture<> interfaces.
I have applied only one ICollectionFixture, but you can apply as many as you want.
Next, add the IDisposable interface to your TestContext class, to ensure context cleanup happens.
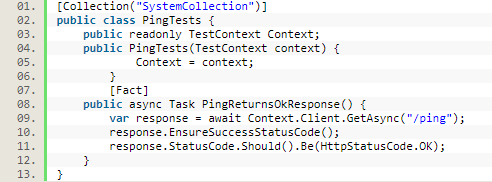
Now, we add the CollectionDefinition name to the tests we want to run in a single collection.
![]()
If the test class needs access to the fixture instance, add it as a constructor argument, and it will be provided automatically.
An important note is that when running tests in a collection, they do not run in parallel. If you want your tests to run in parallel, then you need to either split out the collections or not use collections at all
